Card making Die cutting Embossing How to Techniques Card Making
Love die cutting beeand embossing but can’t choose between the two? We’ve got something for you…

Combining two of our favourite cardmaking techniques in one, Crafter’s Companion’s Cut and Emboss folders will streamline your crafting and allow you to do both at the same time – genius! Not only that, there are stamps to match for an overall coordinated look. A time-saving staple for all the busy crafters out there, simply sandwich the folder and run through a die-cutting machine. Your card will seamlessly emboss and cut in one neat turn. You can then make your greetings as simple or detailed as you like – have a play with inks or give shakers a go.
YOU WILL NEED:
Stamps: Gemini Love & Sunshine, Home Is Where The Heart Is
Gemini Cut & Emboss Folders Sunburst, Bee Happy
Ink pads: Ranger Distress Oxide Mustard Seed, Spiced Marmalade, Crackling Campfire, Wilted Violet, Mermaid Lagoon, Mowed Lawn, Walnut Stain; black
Alcohol Markers
Acetate
Sequins
Adhesives: glue, 3D foam pads
Die-cutting machine

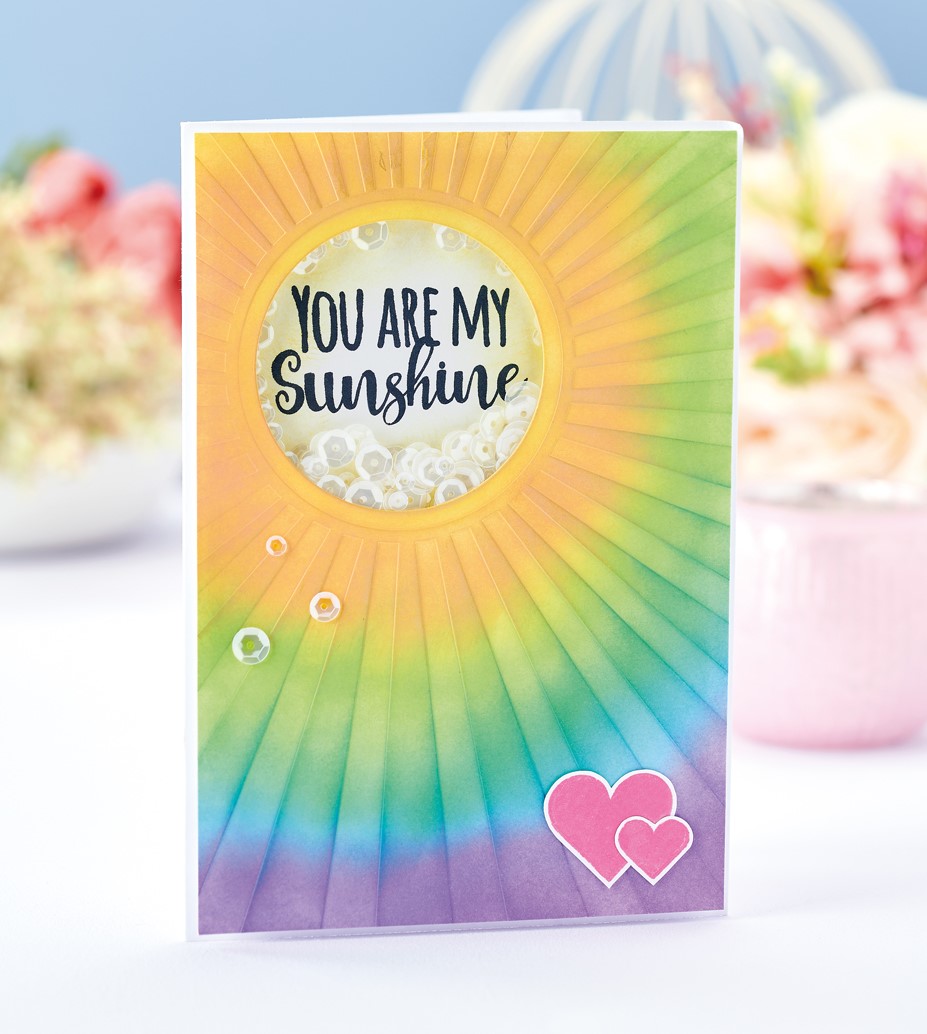
Rainbow Shaker Card
1. Position white card into the Sunburst Gemini Cut and Emboss folder and run through your die-cutting machine. Trim to 12cm x 17.5cm. Apply Mustard Seed distress ink around the circular aperture.
2. Blend out into a rainbow effect using Spiced Marmalade, Mustard Seed, Mowed Lawn, Mermaid Lagoon and Wilted Violet distress inks. Fix acetate behind the aperture and add 3D foam pads around the edge. Lightly blend Mustard Seed distress ink onto a white panel.
3. Once dry, stamp ‘You are my sunshine’ in black. Pour sequins over the sentiment and fix the panel on top. Mount onto a white blank. Stamp two hearts in pink, trim, then glue to the bottom-right. Embellish with sequins to finish.

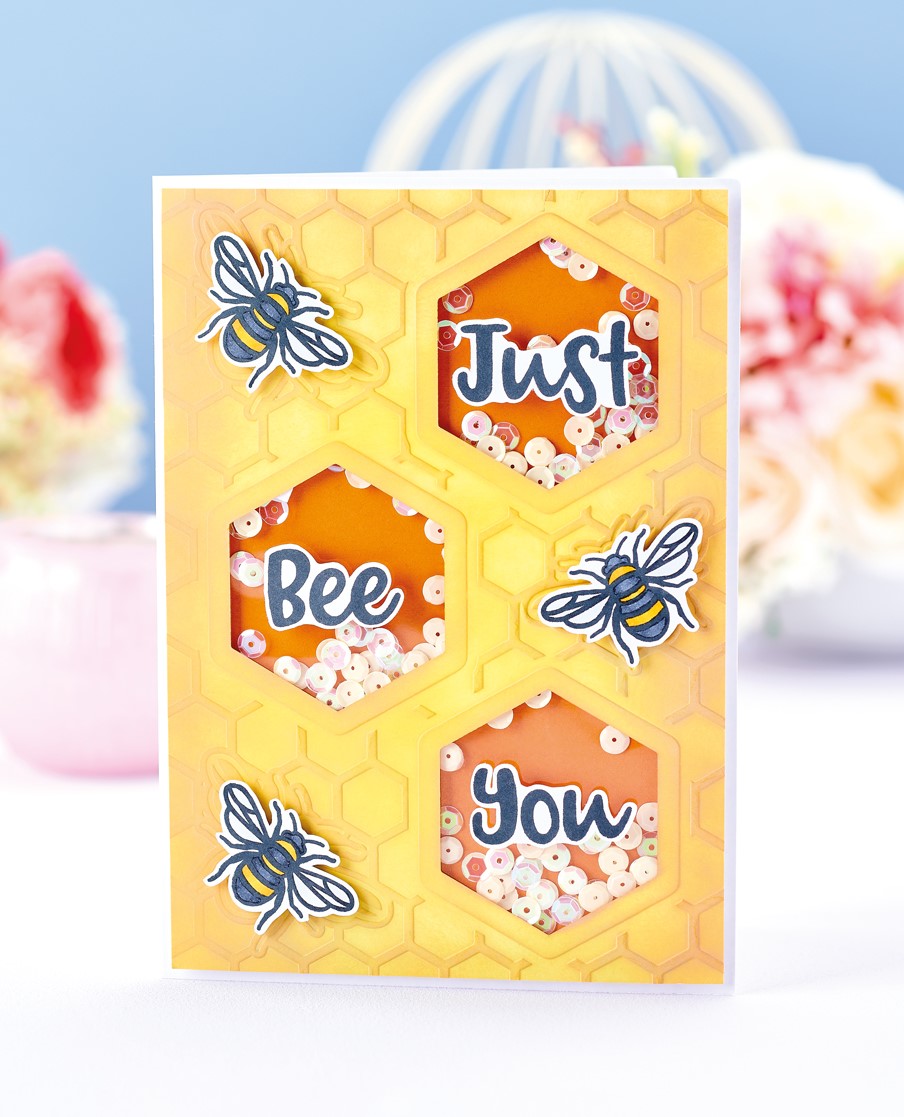
Bee Shaker Card
1. Trim white card to 12.5cm x 17.5cm and run through your die-cutting machine using the Bee Happy Gemini Cut and Emboss folder. Blend yellow and orange distress inks onto the panel, applying the darker colour around the edges.
2. Secure acetate behind each aperture and stick 3D foam pads around the edges. Add sequins and layer orange card on top to create three shaker elements.
3. Stamp, cut out and attach three sentiments. Stamp and colour three bees, then fix with 3D foam pads. Matt the panel onto a white blank to complete.

YOU WILL NEED:
Old books
Die, circle
Wooden skewer
Binder clips
Alcohol marker, orange
Adhesives: PVA glue, glue stick
Die-cutting machine

METHOD:
1. Use a circle die to cut lots of discs from book pages. Fold each circle in…
Halloween crafts Home decor Home decorations How to Papercraft Papercrafter Revamping Techniques Projects

Whilst this may look like a paper cutting that took hours to create, it really couldn’t be any easier. Our talented designer Corinne Bradd has created 15 templates for you to…
Die cutting Home decor Home decorations How to Papercraft Papercrafter Projects

You Will Need:
Templates or SVG files
Brother ScanNCut SDX1200 (optional)
Strong card
Cardstock, various colours
Jute yarn
PVA glue
Autumnal Display
1. Draw a 25cm wide circle on strong card, then draw a concentric 17cm wide circle…
Home decor Home decorations Papercraft Papercrafter Techniques

Shadow box cards, otherwise known as tunnel greetings or diorama cards, are designed to transport the recipient to picture-perfect backdrops in an instant. In this case, PaperCrafter designer Francesca Vignoli…
Birthday crafting Card making Die cutting How to Stamping Techniques Card Making
NO SPAM
Just pure crafty goodness!
YOU CAN REGISTER WITH US TODAY OR CHECK OUT THE MEMBER BENEFITS YOU CAN GET YOUR HANDS ON

Not only will you receive our amazing newsletters packed with the latest projects, exclusive giveaways and freebies, you’ll also get your hands on all of this...
View the benefits
All of our offers will be delivered straight to your inbox - they’re only a click away!
Show me the next benefit...
Get access to loads of free printables and downloads at your fingertips.
Show me the next benefit...NO SPAM
Just pure crafty goodness!
NO SPAM
Just pure crafty goodness!


