


Quill a monogram, flowers and butterflies with these how-tos
FREE PaperCrafter quilling pack, Craft Essentials, Picture frame, Hair comb
• Sketch the outline of your chosen letter onto a 9cm x 12cm rectangle of white card. Trace over these lines with a fine line coloured pen and rub away the pencil when the ink is dry.
• Glue two strips of quilling paper together, keeping the paper flat while the glue dries. Fit the edge of the paper strip to the outline, folding it at any corners and bending it round curves, before fixing it in place using dots of PVA glue.
• Leave the upright strip to dry completely before filling parts of the outline with loosely coiled short strips of paper. Turn some strips into swirls and position them so they appear to extend from inside the letter.
• Mount the letter panel onto a slightly larger pink card rectangle, then onto a bigger piece of green card. Insert this into your chosen frame.
• Glue one end of a quilling strip into a small coil around the quilling tool. Remove it and place the coil on the tooth of a standard hair comb. Wrap the long end around the second tooth up and back down to the coil.

• Fix this length to the coil with a dot of glue before wrapping around the fourth tooth up and back down again. Stick and repeat the process to create a series of eight or nine long loops. Remove the resulting petal from the comb. Make nine more petals in the same way.
• Make a central peg by tightly coiling two pink strips around a quilling tool and glueing. Place the peg on a flat surface and glue the petals around the outside.
• Cut yellow paper strips into four and coil loosely around a quilling tool, leaving 3cm unworked. Glue the loose ends between each petal and raise the curls over the bloom.
• Take 20cm lengths of five different coloured strips and layer in rainbow order. Fold this stack in half then unfurl and fix the strips together at the centre with dots of PVA glue before refolding.

• Glue the five strips at each end of the folded strip together and leave to dry. Loosely curl each of these ends with a quilling tool, allowing the sections which have not been glued to fan out.
• Stick the centre strips together to hold the petal shape and make five more shapes in the same way. Tightly coil two yellow strips of paper to create a central peg and add smaller ones between each petal.
• Fix the pegs onto a square of music patterned paper and add the petals around the edge. Mount this panel onto two further card squares, each one increasing in size, then add to a blank to finish.
• Glue one end of a quilling strip around the centre tooth of a standard hair comb. Pass the other end over the adjacent tooth, behind the comb and back up on the other side of the glued end. Pass it over the other adjacent tooth and back behind the comb.

• Keep manipulating the paper in this zigzag fashion around the teeth on either side of the centre to create a series of loops until there is 8cm of paper left. Holding the centre of the paper folds, carefully slide the strip off the comb and fold in half so the shorter loops are on the outside.
• Continue to hold the centre while wrapping the remaining strip around the outside of the loops and glueing down to make a leaf shape. Make several more leaves from different colours and lengths, ensuring you make two of each.
• Arrange the leaves into two pairs of symmetrical wing shapes. Glue the leaves together and fill in any gaps with small coiled pegs. Leave to dry while still flat.
• Coil a yellow strip around a quilling tool, raising the strip a little as you do so to make a spiral tube. Glue the tube when half the strip is used and remove from the tool. Coil the other end in the same way and in the same direction so it will join up with the first tube. Glue in place.
• Make antennae from a short folded and curled piece of yellow paper and glue to one end of the body. Stick the bottom wings to the middle of the body, allowing the glue to go tacky before pressing the pieces together so the wings are slightly tilted.
• Leave these to dry completely before adding the top wings in the same way, slightly overlapping the bottom pair.
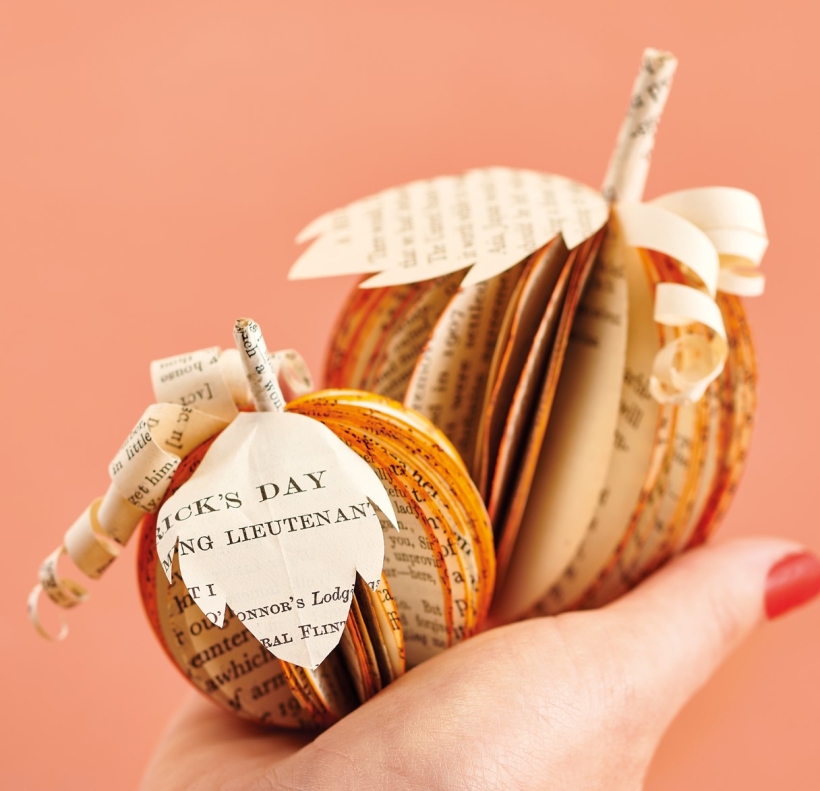
YOU WILL NEED:
Old books
Die, circle
Wooden skewer
Binder clips
Alcohol marker, orange
Adhesives: PVA glue, glue stick
Die-cutting machine

METHOD:
1. Use a circle die to cut lots of discs from book pages. Fold each circle in…
Halloween crafts Home decor Home decorations How to Papercraft Papercrafter Revamping Techniques Projects

Whilst this may look like a paper cutting that took hours to create, it really couldn’t be any easier. Our talented designer Corinne Bradd has created 15 templates for you to…
Die cutting Home decor Home decorations How to Papercraft Papercrafter Projects

You Will Need:
Templates or SVG files
Brother ScanNCut SDX1200 (optional)
Strong card
Cardstock, various colours
Jute yarn
PVA glue
Autumnal Display
1. Draw a 25cm wide circle on strong card, then draw a concentric 17cm wide circle…
Home decor Home decorations Papercraft Papercrafter Techniques

Shadow box cards, otherwise known as tunnel greetings or diorama cards, are designed to transport the recipient to picture-perfect backdrops in an instant. In this case, PaperCrafter designer Francesca Vignoli…
Birthday crafting Card making Die cutting How to Stamping Techniques Card Making


